This is an introductory guide / tutorial on the
OpenID online identity management system, which is increasingly topical - e.g. internet giant
Yahoo! recently
announced its official support for OpenID, on 17 January 2008, and started a
public beta trial of its "Yahoo ID" service at the end of January. OpenID is also one of the main planks of the
DataPortability movement (see
this short video on DataPortability, and this longer
DataPortability video, and
DataPortability discussion).
As with my other intros and howtos this post is aimed at the curious consumer rather than hardcore geeks (who probably already know all this!) and it has a practical bent, with suggestions on how to use OpenID as well as a bit about how it works. This post is my little contribution to hopefully help dispel
OpenID's image as user-unfriendly and encourage more non-techies to use it.
WHAT'S OPENID, IN OUTLINE?
What's OpenID? Many websites make you register your details with them and then login before you can view all their pages or use their full services.
OpenID lets you use just
one username and password combo to register for and sign in to all participating websites (e.g. to post a comment on a
Livejournal blog), so that you don't have to remember a mass of different usernames and passwords. Hence, it's known as a "
single sign on" (
SSO) system - you just register once, for an OpenID, then you can use the same login on multiple sites without having to register for them all over again.
Perhaps it's better called a single
registration system for your internet identity, as via a
Simple Registration Extension it can even get rid of the tedium of manually filling in your "identity information" details on those pesky Website registration forms - in particular your
full name, nickname, gender, email address, date of birth, postcode, country, and time zone. (And now there's
OpenID Attribute Exchange 1.0).
On web sites that support OpenID, you won't have to register with them afresh in order to sign in. If you have an OpenID, you can just login to those sites with a URL (web address) as your username, and your OpenID password as the password; you can even pass on certain personal details (email address, gender etc) direct to the site if you wish, like with a semi-automated registration form filler. (Yes, you can get that on your computer, but only if you are using that computer - with OpenID, whatever computer you're using, anywhere, you have access to this form filler.)
Hardcore geeks can set up their own OpenID servers but the rest of us would get an OpenID by getting an account with an OpenID provider, a site that provides OpenID identity services (like Yahoo did from the end of January).
You register with the provider under a username of your choice, if not already taken, and password of your choice. The provider site will assign you a unique URL which you then use as your OpenID login username (or in some cases you can even use their URL for the login as with Yahoo). But you can alternatively, with a few tweaks, set things up so that you can use your own URL as your OpenID login (e.g. in my case it's www.consumingexperience.com) - and I think that's much better, because if you later switch to a different OpenID identity provider you won't have to change your login URL.
Main benefits of OpenID. Obviously, to be able to log on to all OpenID-supporting Websites or Web services with just
one user ID and password combination is
convenient as a single combo is easier than having to register and remember different user names and passwords for different websites. And it's better than using the
same user / password for several sites to save having to remember multiple passwords, which is not uncommon but which can expose you to the
security risk that bad guys who get hold of your password for one site could then login as you and access your account at
other sites.
Your URL is your logon. As mentioned, a key feature of Open ID is that, for your OpenID username (logon ID) or
identifier, effectively
you just use a URL (i.e. Web address) unique to you, that you control. So, a blog URL could be used as your OpenID username or ID - e.g. in the case of this blog, I can use www.consumingexperience.com as my OpenID identity or URL identifier.
Alternatively, you can use for your OpenID identifier the URL assigned to you by the OpenID provider that you signed up with (you may already, unbeknownst to you, have an account with a site that is an OpenID provider). This provider is technically
separate from the sites that you can sign in to using your OpenID. OpenID providers are not necessarily the same as the websites which
accept OpenID for logons.
So, if you have a Yahoo account, and you want to sign in to another site which supports OpenID (version 2.0 only) like
Plaxo, then in
Plaxo's sign-in box you'd enter just "yahoo.com" as the URL, and then you'd be taken to Yahoo's site where you'd sign in with your usual Yahoo! ID and Yahoo password. Alternatively you can get a long unique URL identifier from Yahoo, or use https://me.yahoo.com/
yourYahooID or http://www.flickr.com/photos/
yourYahooID as your OpenID URL:
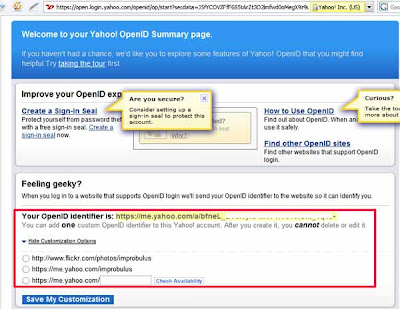
Again as I mentioned above it's best to use your own URL for your OpenID if you can:
domain names are so cheap to buy (or rather rent) these days, that there's no reason not to. I'll explain the tweaks for that later.
I like OpenID not only for the "single registration" concept, but also because OpenID is a
non-proprietary open source technology - an open "identity protocol" which is free to providers as well as users. I hope that more sites will support it and more people will start to use it. There are encouraging signs that it's becoming more popular (e.g. it's one of the planks of
data portability as mentioned earlier), but there may be a while to go yet before its widespread adoption.
Cons. So far, too few sites let users use their OpenID as their login. I hope this changes, as OpenID will never take off properly if in practice you can't actually use it anywhere you want to go!
Even the sites that
provide OpenID identities, e.g. AOL and Yahoo, mostly still don't
accept OpenID logins generally - a bit one-sided, isn't it? They want their users to be able to login
to other sites that take OpenID logins, but they don't want to
let non-AOL or Yahoo etc users sign in to use
their sites and services in full! I suspect they're mainly being protectionist about their customers and customer data and trying to get people to register with them for OpenIDs, on which more later.
Another disadvantage is that the biggest pro of OpenID - the convenience of a single sign-on system - carries with it what's probably one of the biggest cons -
security. If you have a single sign on for loads of sites, and bad guys get hold of your OpenID and password, then they can get into your account on every one of the sites you use (and maybe some you don't) which supports OpenID, masquerading as you. So you're very dependent on how well your OpenID provider maintains security, in an operational as well as technological sense. OpenID is also more vulnerable to
phishing (for more on phishing see this post of a very
helpful session on internet security etc, which even non-geeks should be able to follow).
You're also dependent on your provider for keeping your personal details secure and private too (if you decide to give those details to your OpenID provider), not just your password. And obviously you'll be reliant on your provider not to go down or crash or go out of business.
So it's very important to think carefully about which identity provider you'll use: some may be better and more trustworthy than others. And it's also a good idea to get your own domain name and use your own URL for your OpenID. I'll explain how below.
(For good summaries of OpenID pros and cons see
this post,
this post and the bottom of
this diagram.)
THE QUICKIE - PRACTICAL STUFF
- Getting an OpenID. You can get your own OpenID from an OpenID provider (identity provider or identity server) by signing up with a provider for an OpenID username and password. The provider stores your OpenID login and password or other "authentication" credentials, and also (if you want to provide them) registration details commonly requested by websites: your nickname, gender, email address, country etc.
- You may already have an OpenID if you have an account with certain services like AOL or AIM and, more latterly, Blogger or Yahoo: you just need to find out what URL to use for your OpenID (more details are given below e.g. with Blogger, who are now an OpenID provider, you can just use your blog's URL). I wouldn't use Yahoo though, for now - their system only works with OpenID-enabled sites that support a newer version of OpenID which was only released in December 2007, so it won't work with many sites yet.
- Many identity providers will provide OpenID IDs for free. See later for the links.
- You can have more than one OpenID identity if you wish. And you probably should, if you want to be careful about your privacy.
- You can store various registration details associated with your OpenID identity such as nickname, gender, email address etc - then choose which details you want to give the site you're logging in to, and have the details automatically filled in without your having to re-type them. (Not all identity providers support this "simple registration" feature).
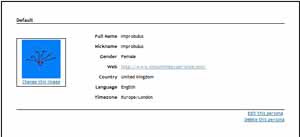
- You can use your own blog or Website URL for your OpenID ID, if you know how (covered below). A plus - you can keep that same URL to use as your OpenID, even if you later change identity providers.
- You can even set up and use an OpenID provider on your own computer server, if you know how (not covered below!)
- Using your OpenID. Once you have an OpenID, you the "end user" can just use your OpenID username to login to all sites that accept OpenID (these supporting sites, or OpenID-enabled sites, are known as "relying parties" or, in my view confusingly, sometimes they're called "consumers", because they're "consumers" of your identity).
There's no need to register or sign up afresh with OpenID-enabled sites, because you prove your identity via your OpenID login.
Mechanics: the "relying party" site that you want to log in to - e.g. Plaxo - contacts the identity provider's servers - e.g. Yahoo's - to verify your identity when you try to login on the site, so you'll be diverted temporarily to your identity provider's site to enter your password with the identity provider (if you're not already signed in with the provider at the time you try to login to the relying party site). That way, you confirm direct with your identity provider (and only with your identity provider, not the relying party) that you are who you say you are, and the provider tells the relying party that you're OK, and youo're sent back to the relying party's site. And you can also choose which (if any) personal details e.g. email address you want to give the site you're trying to access. Don't ever enter your OpenID password on any page that isn't on your OpenID provider's site (in this example Yahoo) - the whole idea is that you only need give your OpenID password to your identity provider, not the relying party site or any other site.
- Note: providers vs relying parties. Note that the identity provider need not be the same company as the accepting site, and in fact usually it isn't - which is part of the point of OpenID, separating the two. An identity provider which offers OpenID identities to its users may also decide to accept OpenID logins from others for its services generally - but it doesn't have to. E.g. AOL provided OpenID identities to its users a while back, so that AOL users could login to other sites which accept OpenID logins, but AOL itself is still only gradually allowing non-AOL users to access AOL services via OpenID login. In other words, not all providers are relying parties, and vice versa. So, just because people can now comment on Blogger blogs using their OpenID logins, it didn't mean that you could use your Blogger URL to login on other sites, even if they generally accepted OpenID - the latter only became easy when Blogger became an OpenID provider itself in January 2008.
- Tip: get your own URL (domain). Then you can use it for your OpenID identifier, using any identity provider you wish, and keep the same URL as your OpenID even if you later switch identity providers.
- In a way, OpenID isn't really "identity" or even an "account". Using OpenID just means that the identity provider will confirm to the relying party that you are the person who controls the website whose URL you enter for the login username. The relying party gets no guarantee that you really are who you say you are (or indeed that the identity provider is telling it the truth!). So you can use OpenID and still be anonymous, or in my case pseudonymous. For me its main advantage is the convenience factor of a single login and password. And believe it or not, it positively helps me to stay anonymous and maintain my privacy, because I can have several different OpenID identities, one for each of the different aspects of my life.
- More details. For those who want to know more even about Open ID, below I'll cover:
- the increasing adoption of OpenID
- how to find out which sites accept OpenID
- what your OpenID identifier is, if you already have one through having an account with AOL, Blogger etc
- how to get yourself a free OpenID identity if you don't already have one, including finding out about identity providers, some things to look out for when choosing one, signing up for an OpenID, how to use your own URL as an OpenID identifier, some useful features of OpenID, and checking your OpenID works
- a walkthrough the process of signing in to a relying party site with OpenID
- Blogger blogs and OpenID
- some OpenID tools for users
- risks and issues with OpenID
- links to some resources (I'm not going to cover how to set up an OpenID provider or relying party server, but I'll include some links to some webpages that do)
- thoughts on possible future developments.
THE LONG AND SLOW
OpenID - a bandwagon?
Open ID is not the only digital identity management service or digital identity network around - but it
is gaining momentum, gathering support from more and more of the big boys and continuing to develop further too, recently
finalising various enhancement
specifications in December 2007:
OpenID Authentication 2.0 (and also the related
OpenID Attribute Exchange 1.0).
OpenID got a big boost last year in February 2007 when
Microsoft,
Verisign,
Sxip and
JanRain announced their intention to collaborate on interoperability between Microsoft's
Windows CardSpace and OpenID, and around the same time the over 63 million
AOL users also
got a
free OpenID service from AOL. AOL have also
since started allowing people to login to AOL websites and services using OpenIDs provided by
certain companies other than AOL. The first telecomms company to embrace OpenID was
Orange France, which
began providing OpenIDs for all their over 40 million subscribers in September 2007. As mentioned earlier, Yahoo! decided at the start of this year to be an OpenID provider, and Microsoft started an experimental OpenID provider
Inkblot in December 2007.
On the blogging front, OpenID was
originally developed at
LiveJournal so not surprisingly it was supported by that blogging platform from early on. In March 2007
WordPress.com began providing OpenIDs to their users. From September 2007, with Movable Type 4,
Movable Type included OpenID authentication built in, so commenters on Movable Type blogs can sign in using OpenID. And in December 2007,
Google's
Blogger began accepting OpenID sign ins from people logging in to post comments on Blogger /
Blogspot blogs, at first
just via their
test bed Blogger in Draft, but
that feature was soon rolled out to
all Blogger blogs, after they'd
fixed some teething issues too.
Blogger began acting as an OpenID provider in January 2008, with users of Blogger being able to use their Blogspot URLs as OpenID logins on other sites which support OpenID, and then even
allowing Blogger users to use their own domain URLs instead of their blogspot.com URLs for their OpenID logins. For those who write or read Blogger blogs I'll be covering OpenID in more detail below, after a general overview.
Dave Recordon was a winner of the 2007 Google-O'Reilly Open Source Award for best strategist for his role in, as they
put it, "pushing Identity into the open source space", and
Google and
Yahoo have modelled their OpenSocial Foundation after the OpenID Foundation, so clearly it's all been developing very well.
On which sites can you use OpenID?
There seems to be no totally comprehensive, constantly-updated list of all the sites that accept OpenID logins - if anyone knows of one do please let me have the URL. The fullest lists of
OpenID-enabled sites are probably these:
As you'll see from those lists, quite a few sites already let you sign in with your OpenID ID. Some examples:
But beware of a twist: not all OpenID-enabled sites will accept OpenIDs from all OpenID identity providers. For instance,
AOL Developer Network have a
whitelist of accepted OpenID providers; if a provider is not on that list, you can't sign in to that site with an ID from that provider. So if you're signing up for an OpenID, best opt for a well known one.
And as I keep emphasising, not all OpenID providers will accept OpenID logins from other sources, e.g. Yahoo doesn't.
How do you get an OpenID identity? Have you got one already? What's your OpenID login ID?
You may already have an OpenID identity if you've previously registered with certain websites or services - particularly some popular blogging platforms.
OpenID have a fuller
list of what your OpenID URL would be if you already have an account with services like WordPress.com; below I give the format for your OpenID URL if you have an account with the most popular sites, such as:
- AOL or AIM - use openid.aol.com/YOURAOLSCREENNAME. Note: If you have an AOL blog, then you can also use its URL, i.e. http://journals.aol.com/YOURSCREENNAME/YOURBLOGNAME, for your OpenID login. Yes, if you have more than one AOL journal, you can use any of their URLs
- Blogger - use your blog URL as your OpenID logon. Go to your Dashboard, Settings, and the OpenID tab will state what your OpenID URL with Blogger is. (Note: the OpenID site says you can use yourusername.blogger.com but that didn't work for me)
- LiveJournal -use YOURLIVEJOURNALUSERNAME.livejournal.com
- Technorati - use technorati.com/people/technorati/YOURTECHNORATIUSERNAME - see further instructions on how to use your Technorati profile URL as an OpenID login, both generally, and in order to comment on a Blogger blog even if you don't have a Blogger account.
- Vox - use YOURMEMBERNAME.vox.com.
- WordPress.com (see the WordPress.com OpenID FAQ) - use YOURBLOGNAME.wordpress.com
- See the list for a few others. You can alternatively use your existing TypeKey or TypePad account, if you have one. (I don't use TypeKey myself, but it seems the OpenID URL for those who do would be: profile.typekey.com/YOURTYPEKEYUSERNAME).
For instance, if your WordPress.com URL is http://yourblogname.wordpress.com, you can use that URL as your OpenID logon.
Got a
Yahoo account? As mentioned, Yahoo are now a provider - go to
Yahoo's OpenID page to customise your OpenID URL. Previously you could have an OpenID using your Yahoo login by signing up for
Simon Willison's
idproxy.net which is "
unofficial but sanctioned", and it's still in operation. (Simon ran a very helpful session on
JQuery at
BarCampLondon3 in November, totally by the by.)
But what if you don't want an account with one of those websites, or what if you don't want to use a URL with "aol.com" or "WordPress.com" etc in it as your OpenID login?
You may well want to use a completely separate dedicated URL for your OpenID logins. Or you may already have your own domain name, or your own blog, and you might prefer to use that URL as your OpenID instead.
The good news is, you
can use a different URL as your OpenID. But first, you'll need to have an account with an OpenID identity provider. And then, if you want to use your own URL instead of a URL assigned to you by the provider, you'll need to take some further steps which I'll cover below.
Alternatively, you can
set up and run your own OpenID identity server - but that's way beyond the scope of this post.
Signing up with an OpenID provider
When you open an OpenID account with an OpenID identity provider, you'll have to choose an OpenID username and password. Obviously try to pick a strong, long password with a mix of letters, numbers, maybe symbols, and both uppercase and lowercase, as this will be your "single password". Then, after sign up, you should be able to use the same ID and password across all "relying party" sites which accept OpenIDs provided by that provider.
Note that although you'll use a URL to login to OpenID-supporting web sites after you've signed up for OpenID, you don't actually have to use a URL as your username when you're signing up
for OpenID with an OpenID identity provider. You can just pick a name that's not already taken. I use "Improbulus" (surprise, surprise).
Normally, after you sign up with an identity provider it will assign you a
special URL on its own site which you can then use as your OpenID username / identifier. For example, I signed up for a
VeriSign Personal Identity Provider account with the user name Improbulus, and they gave me a "Personal Identity Provider Access URL" of "improbulus.pip.verisignlabs.com". So I can sign in to OpenID-enabled sites by entering "improbulus.pip.verisignlabs.com" (without the quotes) into the username box. That "access URL" is what I'll call my
basic OpenID identifier with VeriSign (identity endpoint). With providers like Yahoo!, which use
OpenId 2.0, you can even use just "yahoo.com" as your login username on the relying party site, then sign in to Yahoo with your usual Yahoo details.
But you're not stuck with having to use only that basic OpenID identifier as your OpenID login. You can still use your
own URL as your OpenID login if you prefer (I'll explain how below). They're just separate alternatives. You can log in to OpenID-supporting sites with
either the special URL your identity provider gives you (your basic OpenID identifier),
or (once you've taken a few extra steps) your own URL. Either will do.
Checking if your new OpenID identifier works
How can you test if your OpenID ID is working?
You could of course try to sign in with it on one of the OpenID-supporting sites.
Or you can try
OpenIDEnabled's checkup page for testing OpenIDs - just enter your OpenID URL/identifier in the box and hit Check. (They also have a page to help the geekier ones amongst us to
test OpenID servers they've set up themselves).
Registration form filling - Simple Registration, and personas
Now, an OpenID feature you may find helpful is
Simple Registration, which I touched on earlier. Many websites, when you register with them, ask you to fill in a form with not only a username and password but also
other personal details such as your email address, gender, birth date, postcode, country of origin etc - some of which is compulsory. It's a pain to have to enter all that info just to complete your registration with the site, site after site after site.
So OpenID allows you, under what's called
Simple Registration, to store certain commonly-requested pieces of personal data with your identity provider, which you can then selectively choose to pass on to the relying party when requested during your signing in process.
As long as your identity provider supports simple registration (not all do e.g.
ClaimID doesn't seem to at the moment), you can store with it whichever of those pieces of identity information you choose. And you can edit it all afterwards, of course.
However, different identity providers deal with simple registration differently. It's easiest to illustrate the differences with some actual examples.
MyOpenID allows for a concept called
"personas", where you can create different personas, each with a different set of personal details, all under the same OpenID. One persona may be associated with your birth date, gender, email address etc, but another persona only your gender; or different personas could be associated with different email addresses. The "persona" concept is also
described in the
recently-finalised OpenID Attribute Exchange 1.0 specification as "A subset of the user's identity data. A user can have multiple personas as part of their identity. For example, a user might have a work persona and a home persona."
When you try to login to a relying party site, MyOpenID will fill in the boxes on the registration form for you depending on the persona you pick. For instance, the "identity data" info I've associated with my default persona on MyOpenID by filling in the form on MyOpenID is limited to name, nickname, gender, website, country, language and timezone (I've not included email or birth date; never ask a woman's age!).
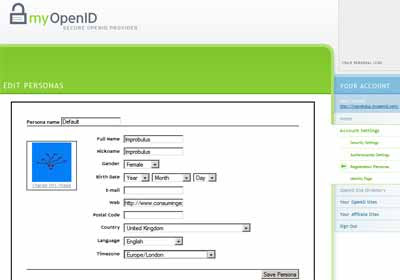
Now I'll try to
login to the AOL Developer site via my MyOpenID ID. That's fine, I get in after I give my OpenID password on the MyOpenID page which I'm taken to. But then the AOL site's registration form for new users asks them for their email, gender and country. Well, that info is automatically entered into the registration form boxes for me by MyOpenID, because I'd previously registered it with MyOpenID; but where I've not given details to MyOpen ID then, not surprisingly, it's not filled in - e.g. here I've not given my email address or date of birth to MyOpen ID, so those boxes are blank below, but my gender and country have been completed by MyOpenID for me. I could then still delete anything I decide not to give the site, or edit it, before I finally hit OK:
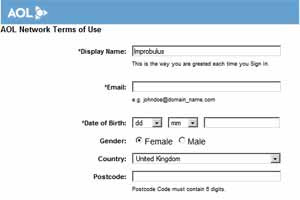
If I had a separate persona called e.g. "Fake Man" where I'd entered some email address and given my gender as male (yes I can do that!), and I'd selected that persona on MyOpenID for logging in to AOL Dev, it would have filled in the email field for me and selected Male. And so on.
Verisign, on the other hand, lets you fill in one set of personal information
in your Verisign account on your "My Information" page there, e.g. your email address (I've just blanked it out from the screenshot below)
:
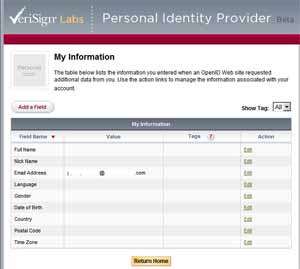
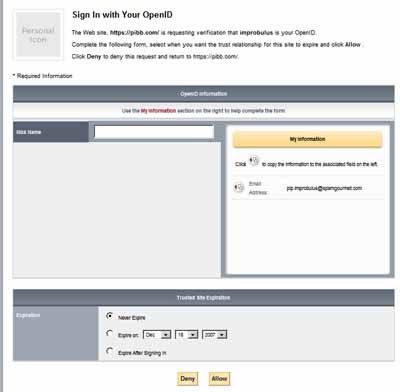
- and then when you try to log in to a relying party site with your Verisign PIP OpenID, you are shown the type of info required by that site on the left (boxes corresponding to the data requested), as you can see below. The info you'd previously filled in on the Verisign site is shown on the right (in this case only my (blanked-out) email address), and you can then choose which ones to "copy across" to the left with a few clicks, to help fill in the relying party site's registration form. More steps are needed on your part, but perhaps you have more control this way:
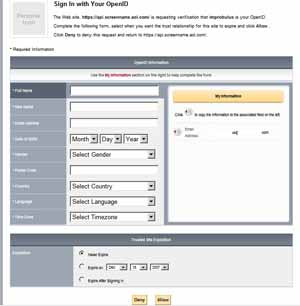
As another example, another relying party site where I'd signed in using my Verisign OpenID only wants my nick name, so there are virtually no boxes on the left shown to me by Verisign:
Which OpenID identity provider?
There are many OpenID identity services which will provide you with an OpenID ID, many of them for free. See:
It's your decision who you go with, of course, but you're probably better off signing up with one of the providers
listed on the official OpenID page as they're relatively known quantities and hopefully can be relied on to be more careful with their security. Reassuringly, all the ones on the OpenID page are also on the
AOL whitelist.
They all appear to be slightly different - see the
OpenID wiki list for brief descriptions.
Myopenid.com is probably the best known as the company behind it,
JanRain, has been heavily involved with the OpenID project from the start. They also have decent
help pages.
ClaimID seems to be venturing into social networking,
encouraging users to "claim" all their websites, and providing supporting "identity tools" like
microformats for your profile contact details. Some providers will charge you for providing you with an OpenID. You pays your money...
But I'd just mention a few particular points to bear in mind when you're choosing an identity provider:
- Does it support "delegation" (covered below)? If you want to use your own URL as your OpenID login, you have to pick a provider that supports delegation - most of them do, but it may be worth checking the point. For instance, VeriSign doesn't seem to support delegation.
- Does it support Simple Registration / Attribute Exchange, and if so how does it work? I think it's very useful, so personally I'd prefer a provider who does have it.
- How much do you trust it to keep your information secure and private, and to not stop being an OpenID Provider, not go bust and not sell your details to someone else?
How to use your own URL for your OpenID identifier
Now if you control your own blog or website, such that you can insert some HTML code into the
head section of the main page of your site template (e.g.
Blogger blogs, or a
WordPress blog that's not on WordPress.com), then you can use
your own blog or site URL as your OpenID login.
This makes use of an OpenID feature known as "
delegation". If you don't run your own identity provider but have signed up with a third party identity provider (which is most of us), you can "
delegate authentication" of your identity to the identity provider that you've signed up with, like MyOpenID or VeriSign or even Blogger. The OpenID wiki explains
how to set up delegation.
To use your own URL as your OpenID:
- Sign up with an OpenID identity provider that supports delegation.
- Set your website or blog up to delegate authentication by inserting certain HTML code into the head section of your blog template or site's home page or index page (i.e. the page that visitors are first taken to if they just try your base URL), and save and publish / upload. Most providers will have the delegation code info for their particular service somewhere on their Help pages. (For beginners - go to the Edit HTML view of your blog template or similar, and in the line just before the </head< tag, paste in the delegation code.)
The basic format for the delegation code is the following, but you'll need to get change YOUR-PROVIDERS-OPENID-SERVER-URL to the URL of your provider's identity server, and change YOUR-OPENID-URL to the special URL given to you by the identity provider when you signed up with them i.e. your basic OpenID identifier (in my Verisign example, that would for me be http://improbulus.pip.verisignlabs.com):
<link rel="openid.server" href="http://YOUR-PROVIDERS-OPENID-SERVER-URL">
<link rel="openid.delegate" href="http://YOUR-OPENID-URL/">
or for providers using the shiny new
OpenID Authentication 2.0 spec, the code
is in the
slightly different format:
<link rel="openid2.provider openid.server" href="http://YOUR-PROVIDERS-OPENID-SERVER-URL">
<link rel="openid2.local_id openid.delegate" href="http://YOUR-OPENID-URL/">
Both versions do the same thing. The first line indicates the URL of your identity provider's identity server - so that the relying party site knows
which server to go to in order to check your OpenID identity. The second line indicates your OpenID basic identifier, so it knows
which identity / identifier it should check.
MyOpenID
uses both versions of the code, plus a bit extra which I won't go into here, with their code currently being the following (change YOURMYOPENIDACCOUNT to your own MyOpenID username before inserting it into your blog template or site HTML, of course):
<link rel="openid.server"
href="http://www.myopenid.com/server" />
<link rel="openid.delegate"
href="http://YOURMYOPENIDACCOUNT.myopenid.com/" />
<link rel="openid2.local_id"
href="http://YOURMYOPENIDACCOUNT.myopenid.com" />
<link rel="openid2.provider"
href="http://www.myopenid.com/server" />
<meta http-equiv="X-XRDS-Location"
content="http://www.myopenid.com/xrds?username=YOURMYOPENIDACCOUNT.myopenid.com" />
For
ClaimID the code is the currently the simpler older
OpenID Authentication 1.1 spec version, being:
<link rel="openid.server" href="http://openid.claimid.com/server" />
<link rel="openid.delegate" href="http://openid.claimid.com/YOURACCOUNT" />
You get the drift... you'll have to
consult your provider's help pages for the exact delegation code to use, as it'll vary with the provider - in particular you need to know the
URL of their identity server to insert it in the server or provider bit of the code.
But you'll notice that the URL of your blog or website, the URL which you want to use for your OpenID identifier, doesn't appear anywhere in the delegation code. It doesn't have to: it's enough that the right code is added to the header section of the template or HTML
of the blog or site whose URL you want to use as your OpenID identifier. As long as the correct code is in the HTML of the website whose URL you've entered on the relying party site, your OpenID sign in will work.
One possible gotcha to note. My main URL is http://www.consumingexperience.com/, but via the settings pages of my domain registrar, I have also fixed it so that the URL of http://consumingexperience.com/ (
without the www) will forward to http://www.consumingexperience.com/. In other words, if a visitor tries to go to http://consumingexperience.com/ in their web browser, they'll be taken to http://
www.consumingexperience.com/. However, when I login to an OpenID relying party site, I
can't use consumingexperience.com - I
have to use
www.consumingexperience.com, which is my main URL, or else it doesn't work and I can't log in. I don't know enough yet to know if it's the provider or just the way OpenID is, but rather than face problems, it's probably best to enter your full main URL rather than being idle like me!
If you change identity providers, all you have to do is update the delegation code in the head section of your blog or website's to your new identity provider's delegation code, and voila you can still use your blog or site's URL with the new identity provider.
Can you have more than one OpenID identity?
You can have more than one OpenID identity if you want. All the talk about a "single ID" or "single-sign-on" with OpenID doesn't actually mean you are
restricted to using a single ID on participating OpenID-enabled sites. Rather, it just means that,
if you wish, you can use a single user/password across all OpenID-enabled sites without having to register separately for each of those sites (which is the main point of OpenID and similar systems).
You don't
have to do that, though - if you prefer, you could stick to using a different ID/password for each site, or have two or three different OpenID identifiers to use for different types of sites (I'll explain how below).
So I could have an "Improbulus" OpenID ID for all tech sites, another OpenID identity like "Singer" for (say) music-related sites, and yet another OpenID user for sites which I'd visit under my real name. And, given
how strongly I feel about privacy and security/safety online, I would.
You can even have more than one OpenID from the
same identity provider, e.g.
VeriSign offers this option.
If you control more than one blog or website, you can use different URLs for different OpenID accounts. Put one bit of code in the head section of one blog, and put different delegation code in the head section of another blog or site!
Can you use more than one URL to "represent" the same OpenID identity?
Conversely, if you really want to you can have
one OpenID account but put the exact
same code in the head section of
more than one blog or website.
Then you can log in to relying party sites using
any of those blog URLs (but with the same password, the one you use for that particular OpenID account).
For instance if I put the MyOpenID code above (altered for my MyOpenID username of course) in the head section of the template for this blog, and also put it in the head section of the template for a test blog originalimprobulus.blogspot.com, then I could log in to any OpenID-enabled site by using
either www.consumingexperience.com
or originalimprobulus.blogspot.com as my "username" / OpenID identifier! Either would work.
What you shouldn't do though is to try to insert delegation code more than once in the same template, but pointing to
different OpenID providers' servers. The site you're visiting might throw a fit trying to deal with being directed to more than one OpenID provider, or it might just take the first one it finds in the head section and ignore later ones, but either way it's not a great idea and I for one don't intend to try it as I don't want to be responsible for giving any poor widdle servers the wobblies, they've got enough to contend with as it is.
The OpenID login process - a walk through
A quick walk through the OpenID login steps might be helpful at this point - that is, logging in to an OpenID-enabled relying party site with your OpenID.
- Find the OpenID login page or tab on the relying party site. That can be the hardest challenge in this process! On some sites the login is OpenID as standard, but on other sites unfortunately you have to choose the correct tab or select the correct option (which sometimes is well hidden away or needs some hunting around for), in order to be able to use OpenID for the login.
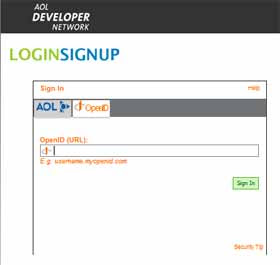
- Enter your OpenID URL. Once you find the OpenID login page or tab, you'll see that they only ask for your OpenID user or identifier, i.e. your OpenID URL, see the screenshot above. No password is required at this stage, nor should it be (if it asks for your OpenID password it may be a bad site trying to get hold of your info!). Just put in your OpenID URL and carry on. (Note: it seems you can leave out the initial "http://" and any final "/index.html" in the URL - works for lazyfingers me, anyway, so I'd just enter www.consumingexperience.com.)
- Behind the scenes. The relying party site then, behind the scenes, goes to find the webpage whose URL you entered, and (if you entered your own URL rather than the special URL given by your provider) sees if there's delegation code in the webpage source (this is known as "discovery"). Then, it goes to whichever server of the OpenID provider is specified in the delegation code.
- Of course, if you entered the URL assigned to you by your OpenID provider (e.g. my VeriSign OpenID URL is http://improbulus.pip.verisignlabs.com), it will go straight to your OpenID provider's servers without checking any other webpage.
- Your identity provider kicks in. At this point things may differ depending on whether you were already logged in with your OpenID provider before you went to the relying party site. The common factor is that you are now redirected to your OpenID provider's site. This might not always be obvious. But you shouldn't be taken to any site - only your provider's site. Be suspicious if it doesn't seem to be your provider's site.
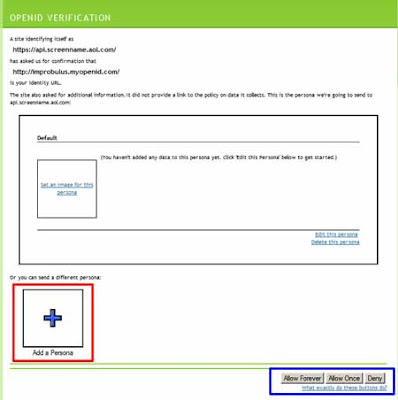
- Choose registration details. If you had already logged in with your OpenID provider via the same web browser before you tried to visit the relying party site, you can just choose or edit any further registration details required by the relying party site (as mentioned above), and then login (sometimes it may be the other way round, you may only be asked for further registration details after you log in). And you'll be taken back to the relying party's site, all nicely registered (if necessary) and logged in. In the screenshot below, I'd click Add Persona (outlined in red) if I wanted to use a different persona with different registration details.
- Enter password and choose registration details. If you hadn't yet logged in with your provider (and there's no particular reason why you should be), then you'll need to enter your OpenID password on your provider's site - that is, the password for your OpenID account with that particular provider - also, before you can proceed further. (If all checks out, i.e. you give the right password, again you'll be taken back to the relying party's site.)
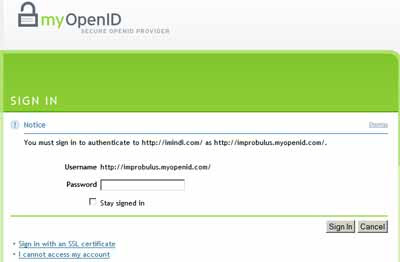
- Choose how long your sign-in is good for. In the MyOpenID screenshot a couple of pics above, do you see in the bottom right hand corner something I've outlined in blue? "Allow Forever, Allow Once, Deny". Those options are self-explanatory. You can choose to always allow that relying party site, if you trust it and want to be able to access it more easily in future, with "Allow Forever". Similarly, just before the "Which OpenID identity provider?" section above, the VeriSign screenshot shows a "Trusted Site Expiration" box at the bottom: Never expire, Expire on [a date of your choice], Expire after signing in. Similarly if you use Blogger as your identity provider:

- Return to relying party site. If you've entered your correct password with your provider, then it'll take you back to the relying party's site, confirming to the relying party that it all checks out, and you'll be registered / logged in to the reyling party site.
Note that it's the server
at your OpenID provider that checks that you've entered the right password for the OpenID account associated with your URL. The relying party site never gets to see your password. Simple and effective, isn't it?

Blogs and OpenID
Now on to blogs. There are of course two ways in which OpenID can be relevant to a blog, on whatever blogging platform:
- Can the blog accept OpenID logins from commenters? i.e. is it an OpenID relying party, is it OpenID-enabled?
- Can you use your blog URL as an OpenID login (a) with delegation, or (b) directly (i.e. without having to insert any delegation code)?
I'm really mainly a Blogger user so I'm going to cover in detail just that platform. However, I believe there is a
WordPress plugin for those who want to enable OpenID commenting on WordPress blogs and see
this on amending WordPress files.
Allow commenting on your Blogger blog by OpenID users
For 1, as mentioned earlier the answer is now "Yes" for Blogger / Blogspot blogs. Blogger blogs
can now be set up to allow comments by people who login using OpenID.
As you'll know if you have a Blogger blog, you can control the sorts of people who can post comments on your blog: Anyone, Registered Users, Users with Google Accounts or Only members of the blog (Dashboard - Settings tab, Comments, Who Can Comment).
Obviously "Anyone" lets anyone comment on your blog, even anonymously. So it's up to them if they want to use OpenID or not.
If you want to stop anonymous comments but allow readers to comment using their OpenIDs, you can pick "Registered Users" to enable OpenID commenting. This would widen the pool of commenters beyond just other Blogger users. In other words, "Registered Users" will allow both OpenID and Blogger users to comment (AOL, LiveJournal etc logins are of course just one type of OpenID, as you now know):
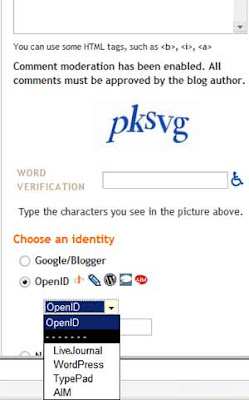
And Blogger will even give hints to LiveJournal, WordPress, TypePad or AIM users as to the format to use for their OpenID:
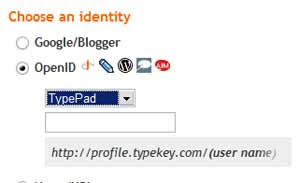
There's
 There's no downside I can think of to doing that, and it'll be much better for your security.
